How to Build an Aluminum 8020 Truck Bed Sleeping Platform [with Drawer Storage]

After adding a new Tune M1 camper to our truck, we spent a lot of time looking at ways to shave weight from our Tacoma Overland Build. One way was to redesign our Tacoma Truck Camping Setup, this time using 8020 extruded aluminum as the primary building material.
A word of warning - although rebuilding our sleeping platform with extruded aluminum resulted in a 39% weight reduction (or 45lbs in our case), we would not recommend this material for a sleeping platform unless weight savings is paramount.
Working with 8020 was an incredibly tedious and time consuming process (be ready to dedicate several days to a week to the project). For the average truck camping setup, plywood is a much easier and practical build material.
However, if you’re ready to build a truck bed sleeping platform or drawer storage out of 8020, this guide will walk through all the tools, materials, and methods we used. And while the measurements used apply to our short bed Tacoma, you should be able to modify them to fit your truck's dimensions.
Aluminum Truck Camping Sleeping Platform Video Overview
This walkthrough will show both the completed sleeping platform build and some detailed aspects of the construction to lend context to the rest of this build guide.
*(This post contains affiliate links. This means we may receive a small commission, at no additional cost to you, if you make a purchase through a link. See our full disclosure.)
Tools Needed
These are all the tools we used to successfully build this 8020 aluminum truck bed sleeping platform with drawer storage.
Miter Box Saw (we used our Bauer model from Harbor Freight, but this cheap Metabo* would do the trick too) and a 10” Aluminum Cutting Blade* - this is used to cut the 2020 aluminum extrusions
Reciprocating Saw - used for:
set to 30 degree angle to make the storage hatch cut-out in the platform cover
cutting platform and drawer plywood pieces (**if you have access to a table saw, this will be better for longer cuts**)
making the cut-outs in the side valances to clear the 90 degree brackets. We also used this to make a cut out in the cover for our propane tank storage, notches for the Tune M1’s mounting brackets, and other contour cuts in the platform cover as needed to fit our Tacoma’s bed tightly.
Kreg Jig Micro Kit* & 3/4in Pan Head Kreg Jig screws* - for assembling the drawer storage. Here are some tips on how to use a kreg jig to assemble the drawer.
Metric & Standard Allen wrench sets (most of the bracket kits we used included the necessary allen wrench, but it’s good to have a spare set on hand in case one gets damaged)
Hole Saw 1-⅛”* - used for cutting the access hatch in the platform cover and for adding 12v outlets
Safety Gear
Safety Glasses
Gloves - work gloves, and nylon (for applying Raptor Liner)
Respirator mask (for spraying the platform cover with Raptor Liner)
Optional Tools:
Router with 45-degree bit - this was used to router the outer-facing edges of the platform cover for a smoother, more professional finished look
Sander - for smoothing edges of the drawer, platform cover, and valances
Air Compressor - for applying Raptor Liner
Rivnut Kit* - can be used to anchor the platform to your truck bed (be sure to check clearances under your bed prior to drilling for rivnut installation. We typically recommend using stainless steel rivnuts* in a truck bed for corrosion resistance.
Supplies Needed
This is a comprehensive list of all the materials and hardware you’ll need to build this 8020 aluminum truck bed sleeping platform.

(2x) 4x8 Sheets of 1/2in Birch Plywood - we got ours from the big orange box store
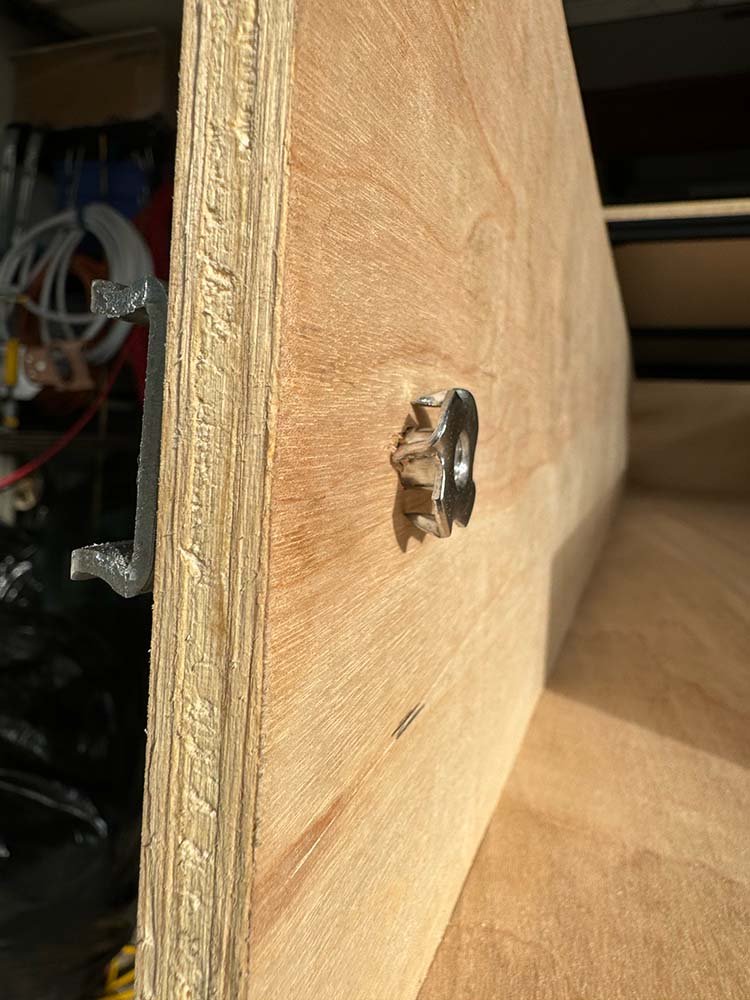
(1x) L-Brackets* - these were used for additional support when connecting the rear vertical supports to the platform base framework (on the inside below the drawer slides)
(2x) T-Brackets*
(2x) Corner Brackets*
(1x ) #10 ½” stainless pan head screws (100pack)* (only 12 are needed) or non-self tapping #10 ½” hex head screws (this is what we used sourced from our local hardware store)
Roll-in M6 T-Nuts* - many of the bracket sets come with slide-in T-nuts that must be slid into the t-tracks of the extrustions, these roll-in t-nuts can be installed after assembly and can really save time and a lot of headache in the event you forget to put the slide-in T-nuts in. 😅
Compression Latch* for closing, locking, and opening the drawer
56” Drawer Slides* - if you have a long bed you can source longer drawer slides to better take advantage of your additional drawer length.
Stainless ¼-20 T-Nuts* and 16x 3/4in Stainless ¼-20 Stainless Button Head Allen screws (from local hardware store) for mounting drawer slides
Raptor Liner Kit* for finishing the top of the platform cover (only used 1 of 4 bottles)
Wood Sealer/Finish - we chose to seal the drawer and side panel covers with Teak Oil*, but you can use any finishing product or wood sealer you prefer
Blue Loctite* - applied to every tiny little fastener’s thread 🤪 to keep them from backing out with the vibrations of driving.
Building the Sleeping Platform Framing
In this section we’ll walk through all of the 2020 extrusion cuts and dimensions for each step of the platform framework assembly. While these dimensions are perfect for our 2004 Tacoma’s 5ft bed, they’re provided for reference only and will need to be adapted to your truck bed’s specific dimensions.
Platform Base (bottom) Framework
(1x) 15 ⅜” (rear [cab-side])
(1x) 25 ⅜” (front [tailgate-side])
(2x) 58” (sides)
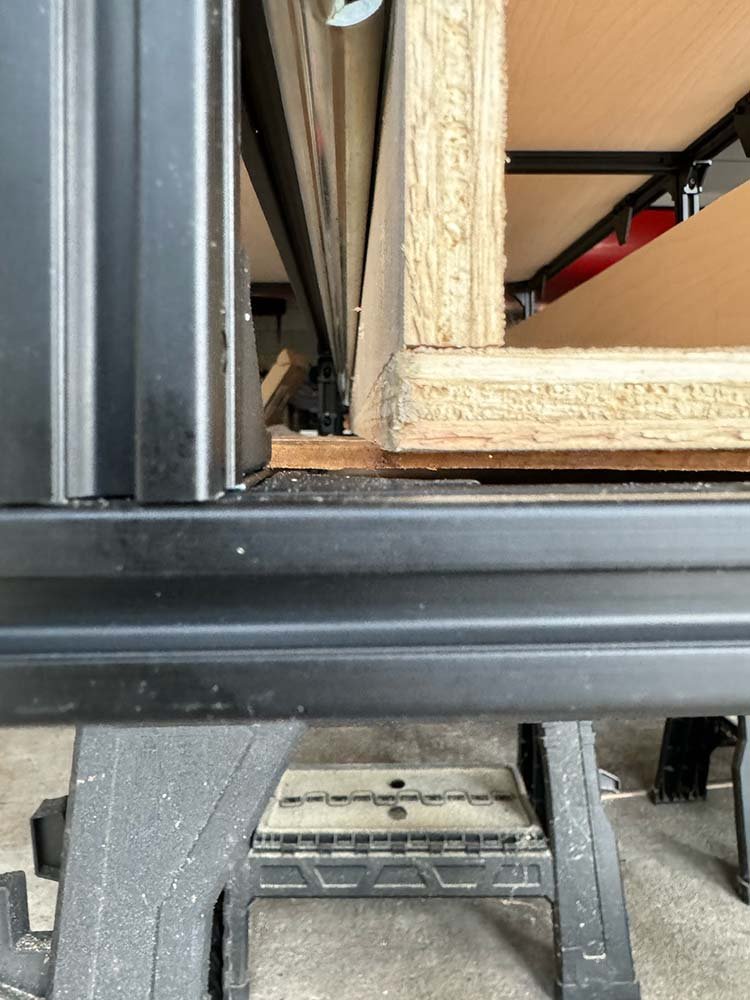
Unlike our previous sleeping platform builds, there is no plywood platform base creating a flat surface to build on top of. Instead, we designed the platform base framework to rest on the flat surfaces of the truck bed itself.
You should spend some time looking at your truck bed’s surface to ensure your platform base framework is able to sit relatively flat and level on the bed of the truck. Otherwise you may need to make a platform base out of plywood to anchor the rest of the platform to.


All subsequent pieces are attached to the base using 90 degree brackets, L-connectors, 3-way connectors, L-brackets, or a combination. Refer to the video walkthrough for clarity on how and when we used these.
Vertical Supports
(4x) 11 ¾” (corners)
(2x) 3 ½” (center bottom drawer slide support)
(2x) 7 ⅜” (center top drawer slide support)

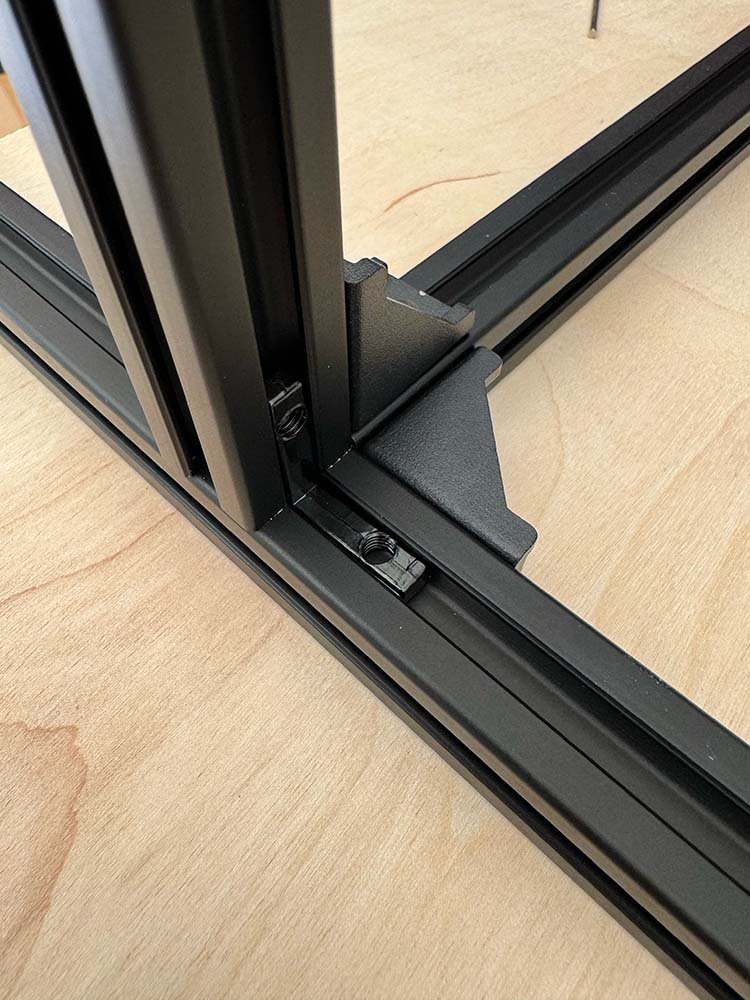
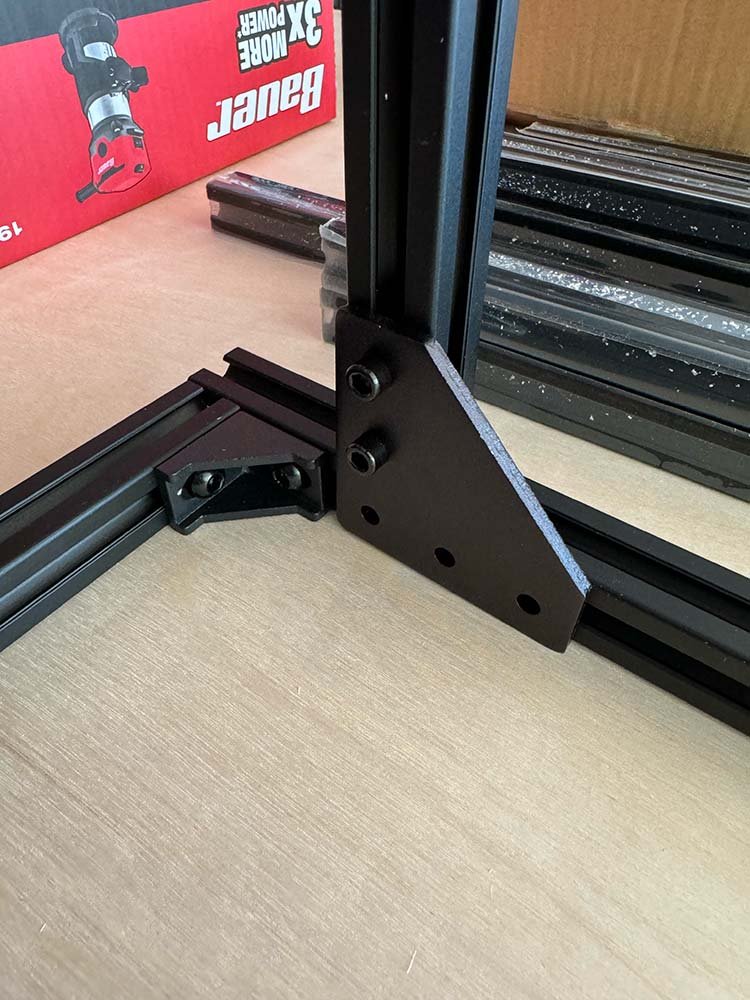
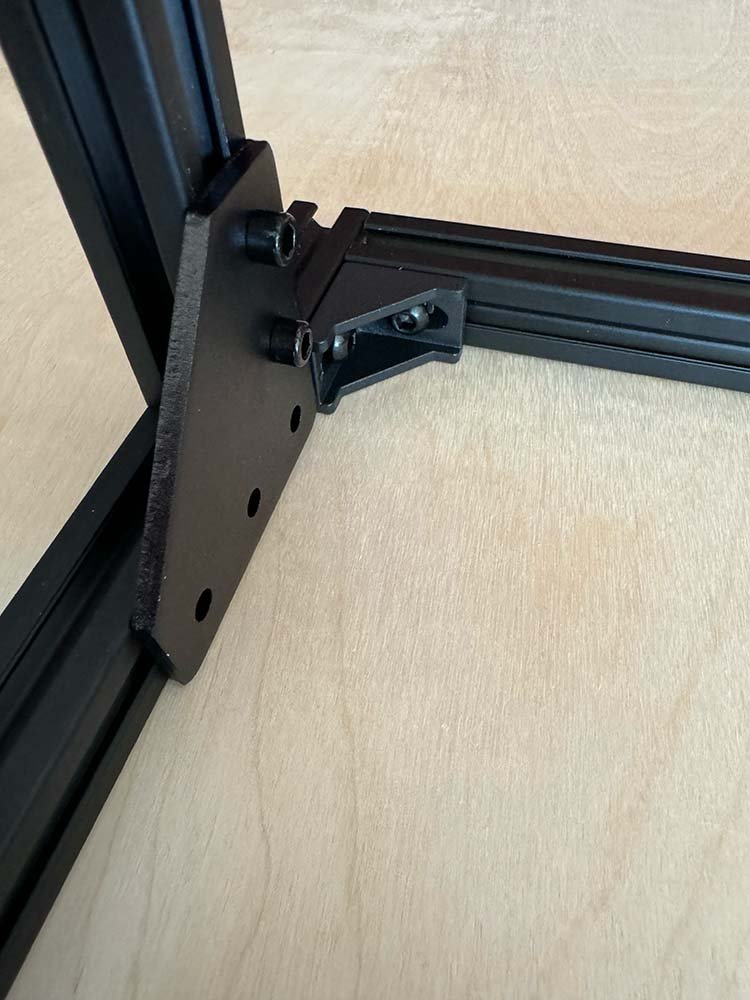
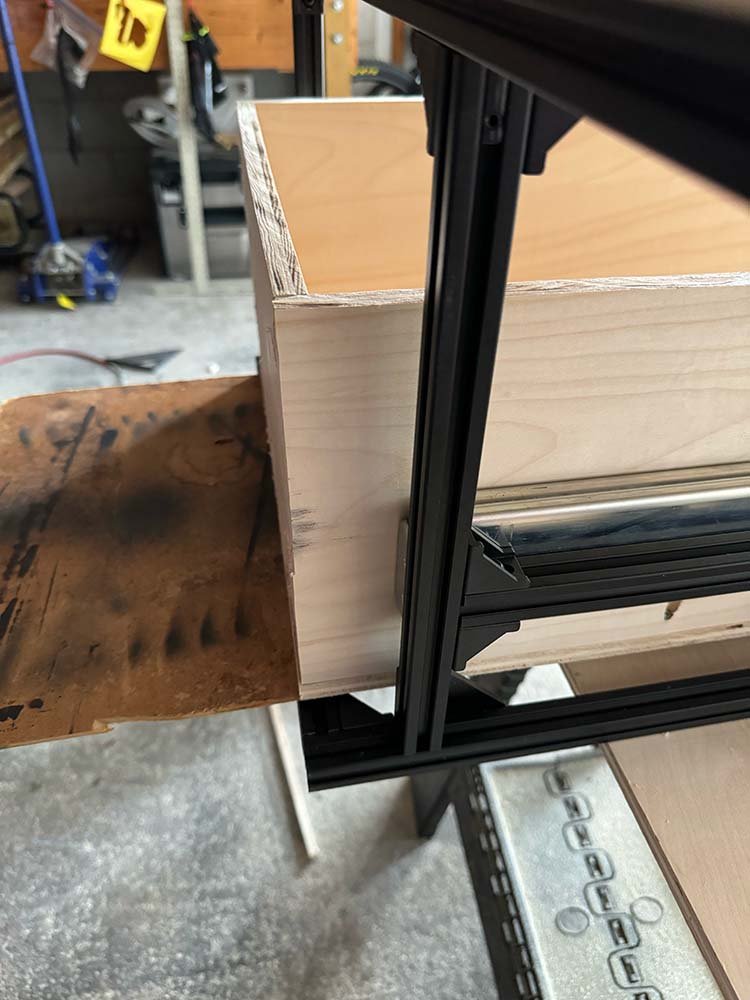
The vertical supports serve as the primary structural support for the top of the sleeping platform and they frame out the space used to house the drawer. They connect the Platform Base Framework, Cover Support Framework, and Drawer Slide Supports to complete the structure. They’re attached to the Platform Base Framework using a combination of L-connectors, 3-way connectors, and 90-Degree brackets (for the front left and right supports), and L-brackets (for the rear left and right supports) - see images above for clarity.
Drawer Slide Supports
(2x) 55 ¼”
These are attached to the corner Vertical Supports using 90 degree brackets above and below each end of the aluminum extrusion. Then the center vertical supports (see above) are mounted above and below the drawer supports, centered between the four vertical supports. For our build this left 27 ¼” on either side of the center supports (again refer to the walk-through video for clarity).
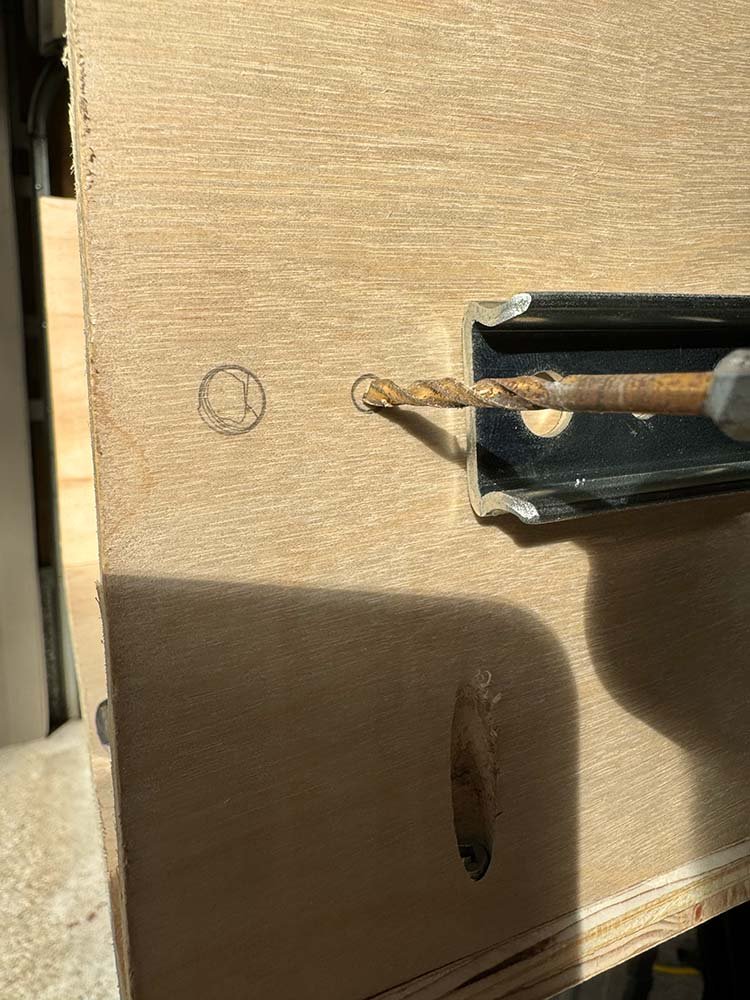
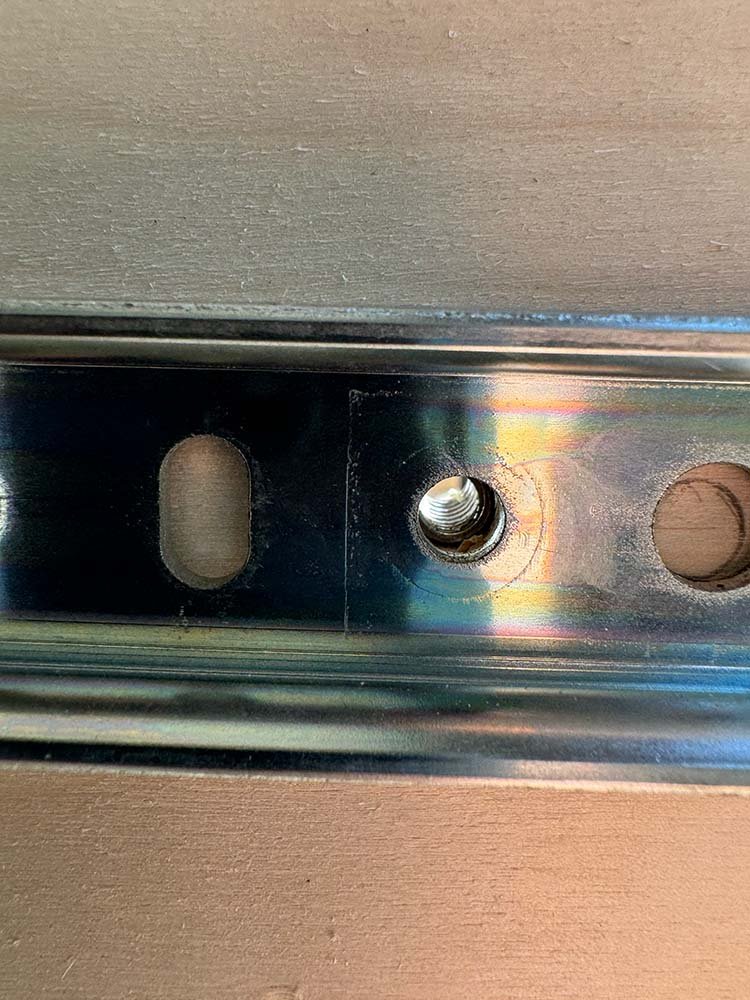
Once the framework is completely assembled, and the drawers are cut and built (more on this below), we recommend using the roll-in M6 T-nuts (so they can be slid and adjusted easily to align with the mounting holes on the drawer slides) along with 8mm M6 screws to secure the drawer slides to the drawer slide supports.
Platform Cover (top) Support Framework
(1x) 15 ⅜” (center brace)
(1x) 26” (rear [cab-side])
(1x) 25 ½” (front [tailgate-side])
(2x) 55 ¼” (sides)


These pieces are attached to themselves AND to the vertical supports using a combination of 90 degree brackets, L-connectors (in the drawer face area), and 3-way connectors (on the right hand/passenger-side faces).
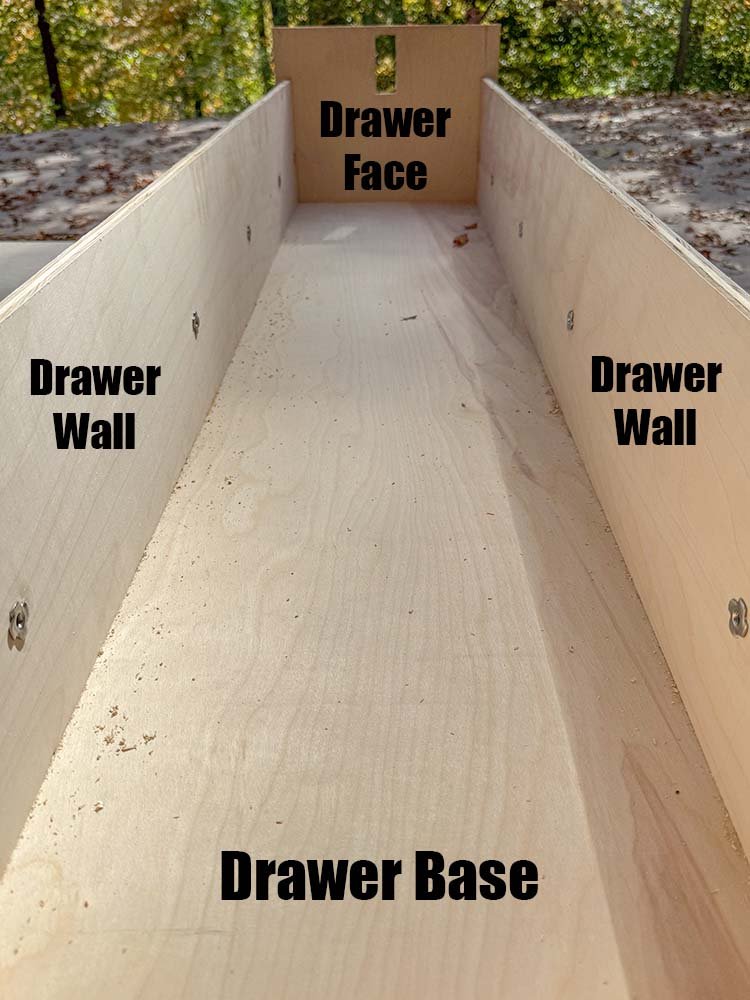
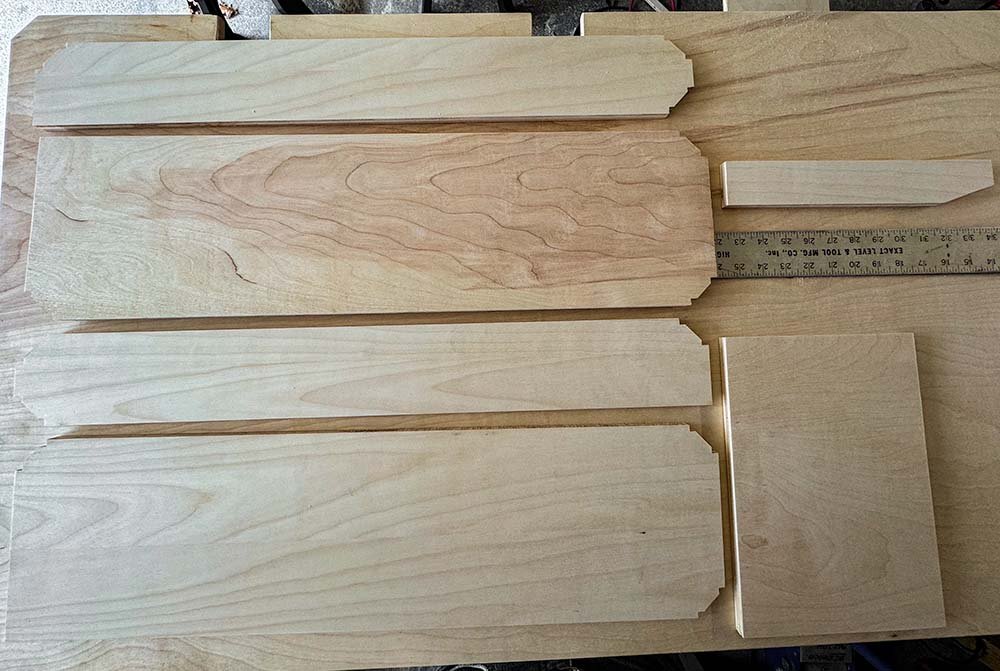
Making the Platform Cover, Drawer, and Side Valances
These are all the 1/2in plywood cut pieces used to construct the Platform Cover, Storage Drawer, and Valances.
Platform Cover: Cut 1/2in plywood to 57 ¾” x 27”
Towards the end of the build, you’ll create a storage hatch cut-out in the Platform Cover. You’ll want to do this later so that you can ensure it clears the drawer and the framework below the cover.
Our hatch is 30” x 7”. Once it was traced, we used a 1 ⅛” hole saw to create both a basic handle and a place for the reciprocating saw blade to start the rest of the cutout. See the image below for clarity. By setting the reciprocating saw to 30 degrees (inward) it creates a nice beveled edge for the hatch lid to rest on.
The Platform Cover will likely need to be further modified to fit your needs and truck’s bed rail contours, camper brackets, etc.

We had planned to attach the Platform Cover to the framework using this method, but so far we’ve found that the cover is held tightly enough in place by the truck’s bed rails and our camper’s mounting brackets. Plus, it’s easier to remove when we need to access the electrical fuse box and wiring below.
Drawer Base: Cut 1/2in plywood to 14” x 58”
The drawer base makes up the bottom of the drawer. The three drawer walls are attached to the top of the drawer base (and each other) with Kreg jig joints.
Drawer Walls
Cut 1/2in plywood to:
(2x) 8” x 58” (sides)
(1x) 8” x 13 ⅛” (back)
Drawer Face: Cut 1/2in plywood to 11 ⅝” x 15 ¼”
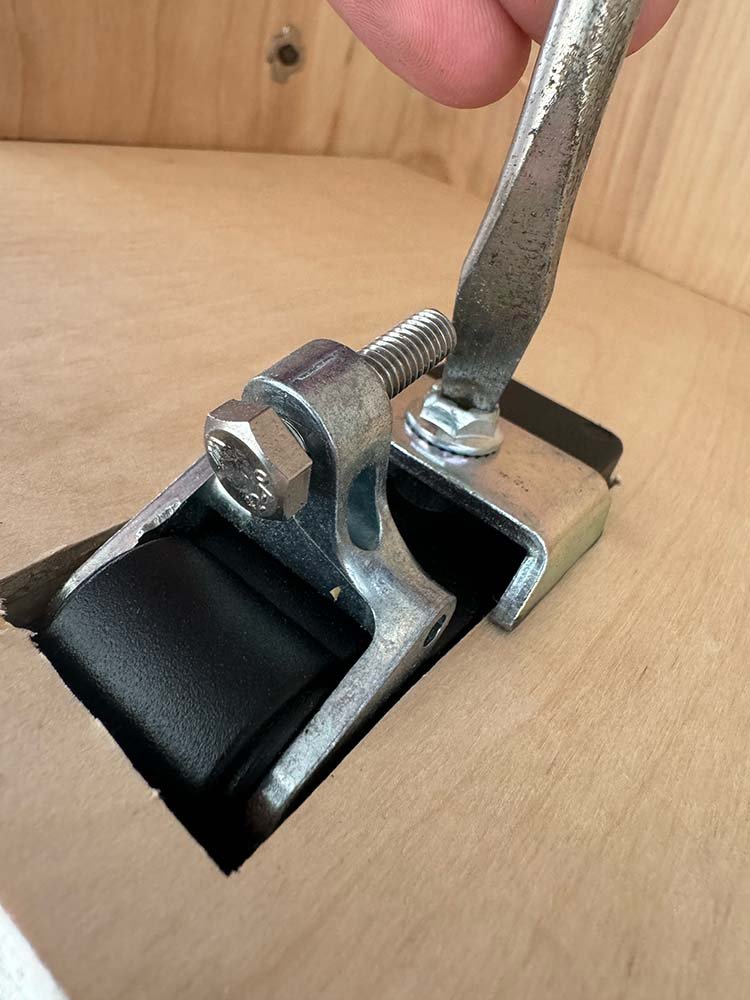
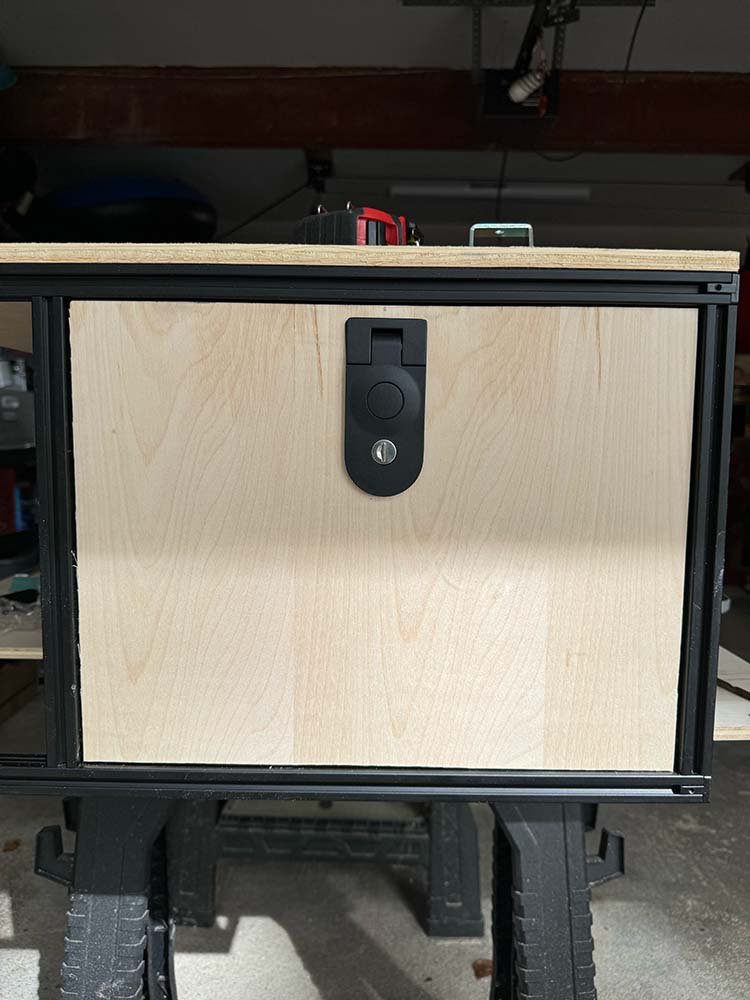
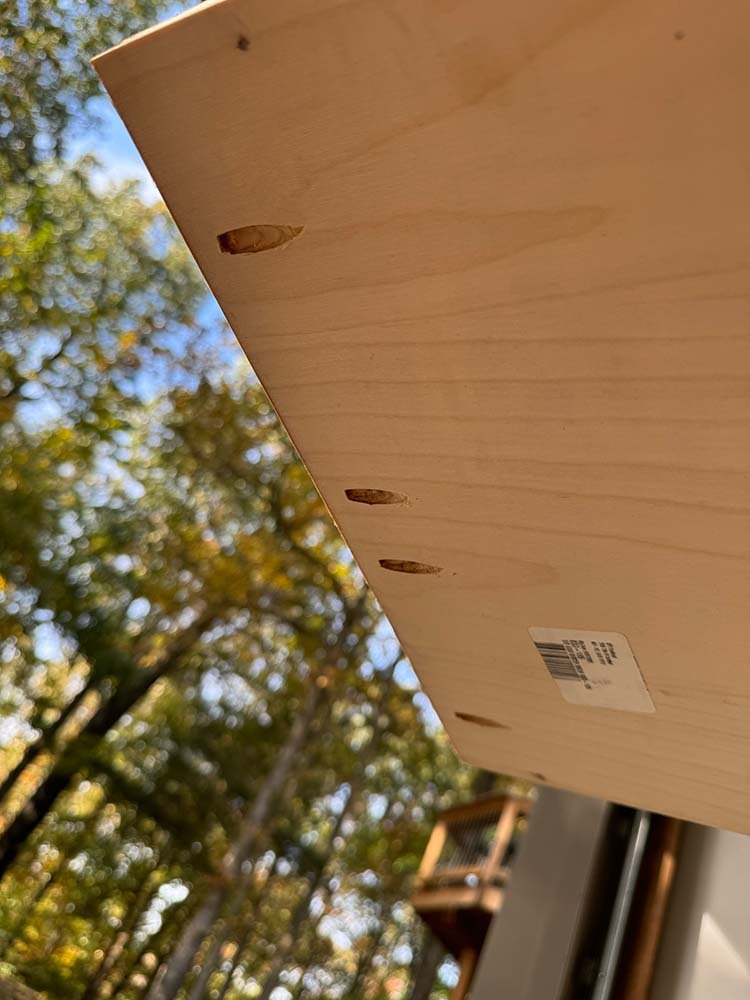
The Locking Handle Latch requires a cutout to be made in the Drawer Face that measures 3 ½” x 1 ⅜”. Center it on the Drawer Face. The top of the cutout should be ½’’ down from the top of the drawer face so that the locking mechanism will make contact with the framework above when the drawer is closed.
Tip: We used a ½” drill bit to allow space for the reciprocating saw to get started.
Installing the Platform Drawer
Once you’ve constructed the platform framework, mounted the drawer slides to the drawer slide supports, and attached the drawer walls to the drawer base, you’re ready to start mounting the drawer to the drawer slides.
You’ll need to raise the drawer slightly to ensure the drawer doesn’t contact the Platform Base Framework when opening and closing the drawer. To do this, we slid the assembled drawer in between the drawer slides and placed a piece of ⅛’’ plywood (pressboard) beneath it in the front and rear.
Then, we marked the front drawer slide mounting holes on the outside of the drawer walls, drilled and installed the Stainless 1/4-20 T-Nuts in these locations, and attached the drawer slide temporarily.
Next, we fully extended the drawer, keeping the platform framework anchored to our work surface (because it is lighter than the drawer and will tip), and carefully marked each of the remaining drawer slide mounting points on the drawer walls.
Finally, we removed the drawer from the drawer slides, drilled the marked locations and installed the remaining Stainless 1/4-20 T-Nuts, before reinstalling the drawer into the drawer slides using the ¾’’ 1/4-20 Stainless button head allen bolts.
Once the drawer is mounted to the drawer slides you can mock up the positioning of the drawer face, and attach it to the drawer base and walls using kreg jig joints. Be VERY careful when screwing the kreg jig joints together during this step so as to avoid the screws from protruding through the front of the drawer face.
Side Valances
These valances install in the outer sides of the platform framework to cover the interior and drawer storage.
Cut 1/2in plywood to:
Lower: (2x) 27 ¼” x 3 ½”
Upper: (2x) 27 ¼” x 7 ⅜”
Left of Drawer: appx 11 ¾” x 8 3/16 (this space was not completely square and had to be trimmed until fit)
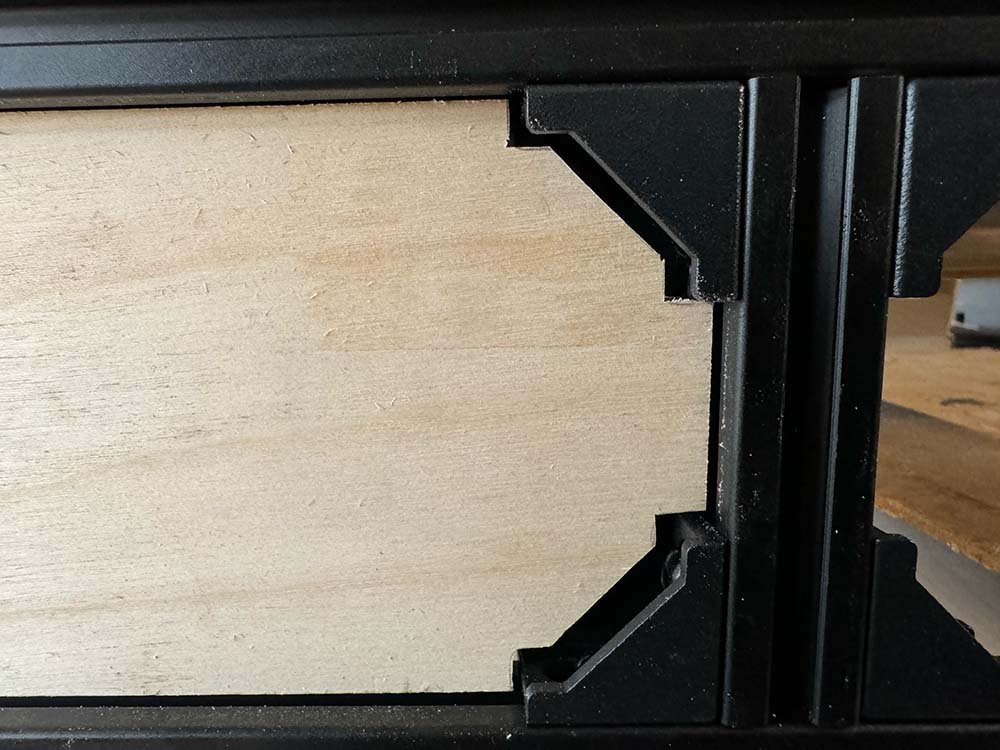
We notched each Side Valance in the corners as needed to fit inside the 90 degree brackets, using a spare bracket as a template for making these cuts. We then attached them to the inside of the framework using T-brackets and ½” stainless screws.
Applying Wood Finishing
You can use any wood finishing you’d like, though we recommend using a finish that protects agains moisture. We chose to finish the Platform Cover with Raptor Liner (truck bed liner) to give it a nice durable coating. It must dry/cure for 48-72 hours after application. We sealed the drawer and side valances with Teak oil. Teak oil is easy to apply (or reapply when needed), and retains the natural look and grain of the birch plywood.
Outfitting Your New Truck Bed Sleeping Platform
These are some handy items we used to run power to the sleeping platform and help organize the drawer storage.
12v Electrical Outlets* - You can easily add these 12v outlets to your sleeping platform cover or the Valance next to the drawer using the 1-⅛” hole saw. These marine dual 12v outlets* are great too if you don’t want to mess with drilling (we used them to make constant power at the rear (cab-side) of our platform for our 12v ARB Elements Camping Fridge).
ARB 10GA Wiring Kit* - We’ve used these high-quality double-sleeved kits to run power from our starting battery and dual battery systems to sleeping platforms in multiple truck camping setups over the years. Just ensure that it meets your camping power draw requirements.
MC4 Connectors* - We like to use these MC4 electrical connectors when possible because they provide a nice sealed waterproof connection.
Bluesea Systems Fuse Block* - This is a great way to fuse and distribute power throughout your sleeping platform and truck bed. We mounted ours to the aluminum extrusion of the sleeping platform’s framework using one of the spare T-brackets we had left over.
Sidio Crates* - These crate organizers fit perfectly in the drawer and are a great way to keep gear organized.
That’s everything you need to build a custom 8020 aluminum sleeping platform and drawer storage for your truck bed. If you have any questions, drop a comment below.
And for more helpful truck camping, overlanding, and family travel tips be sure to SUBSCRIBE to receive our bi-monthly blog updates.